![[TOC]](gif/back.gif)
Currently it supports following basic HDF objects: file ID and descriptions annotations, 24 bits/8 bits raster image binary data, various type of SDS data, Vdata, and Vgroups. User can flexiblely browse through the SDS, Vdata, and Vgroups data sets through using scroll attributes list, push buttons and slider bar provided by the corresponding popup interface dialogs.
By default option it is conveninently geared to extract the SDS dataset from any HDF/NEXUS file. A user can easily extract any 1D/2D/3D SDS data and display the data in ready packaged graphic sub-program. It also provided various output features like PS plots, TIFF/PNG/PICT/ASCII files.
The hdfb also provides a simple command, SDS, which allows the user easily to access any SDS data array as an IDL variable after the normal completion of loading the SDS data sets. This provides the feature a user can easily plug-in his/her own preferred IDL visualization program into the hdfb. This SDS command and plug-in feature are only available in IDL developper verion but not for run-time or IDL vitrual machine version.
	hdfb.sav Download hdfb for IDLVM 6.0

	hdf.zip Download samples of HDF/NEXUS files for hdfb

If a user want to get the complete collection of the IDL sources the following link is availble.

	Idl.zip Download the complete set of EPICS/IDL source programs

	Setup Requirement Contains the installation and IDL setup instruction for UNIX and WIN system
The hdfb frontend system consists of 3 files: os.init, hdfb, and hdfb.pro. All the programs implicitly used by the hdfb is also contained in the installation directory and they will be dynamically loaded into IDL at runtime.
os.init          - A system dependent file shared by IDL programs with
                   specific settings for UNIX/WIN system.
hdfb.pro         - A HDF/NEXUS browser written in IDL widget application
hdfb             - A UNIX script file, it automatically sets up the
                   IDL and runs the hdfb.pro
To access the newest version of hdfb, a user has to include the /usr/local/epics/extensions/bin/solaris-sparc directory in his/her command search path.
	UNIX SYSTEM

	1) To access the IDLVM 6.0 version with hdfb.sav on the
	Unix system just enter the following at the unix prompt:

		idlvm hdfb

	2) To access the hdfb developer version on the Unix system
	just enter the following at the unix prompt:

		hdfb

	WIN SYSTEM

	To access hdfb on the WIN system first invoke IDLDE, then just
	enter the following at the IDL prompt:

		@os.init
		hdfb
The extracted SDS data can be saved in XDR format which is stored at the subdirectory XDR at the current working directory. The xdr file should be ended with '.xdr' suffix. For more knowledge of easy IDL xdr routines please refer the xdr_open.pro.
The extracted SDS data can be saved as TIFF file. The graphic tiff file is stored at the subdirectory TIFF at the current working directory. The tiff file should be ended with '.tiff' suffix.
The temporary text file 'hdf_data.txt' is used by the hdfb for holding the intermediate SDS data or HDF data description. For consistance the text file should be ended with '.txt' suffix.
The scroll text area displays the brief HDF file descriptions for the selected HDF object type of the input file. The drawing area shows brief graph of the 1D/2D data extracted from the SDS object. If the SDS "Plot Window" option is set for any HDF / NEXUS file opened, depending on the data object selected from the SDS list, the appropriate EPICS extensions IDL sub-programs PLOT1D, PLOT2D, VIEW3D_2D will be popped up.
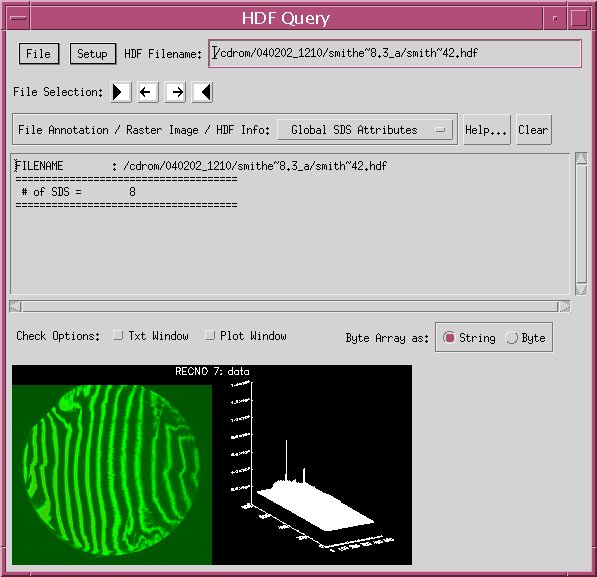
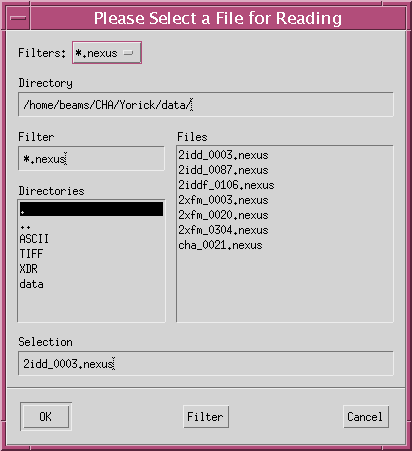
File Menu
	Open... - file selection dialog
	Quit    - exit hdfb
The file selection dialog allows the user to navigate through the file system to pick the desired HDF / NEXUS file. The valid filter strings for file selection include '*.hdf', '*.nexus', '*.Nx','*.nx'. It comes with the defalut file selection type as '*.hdf'. If different file convention used, a user can modifiy the 'Filter' field to suit his/her own condition. At the completion of the file selection dialog, the SDS query dialog will pop up which allows the user easily to access any desired data set from the SDS list. The SDS scroll list contains all the SDS name and dimension attributes found from the file.
Setup Menu
	Save PVTCT - save the IDL color table to 'pvtcolors.dat'
	Load PVTCT - load the IDL color table from 'pvtcolors.dat'
	Color...   - access the IDL XLOADCT program
The IDL XLOADCT program allows the user to access any of the IDL support default 40 color tables. The Save/Load PVTCT allows the user to save or load a preferred private color table. The default color table used is the 'GRN-RED-BLU-WHT'.
HDF FilenameThis text field display the current filename selected by the user. New HDF / NEXUS file can be entered directly through keyboard typing, the new updated QUERY - SDS dialog will pop up as new file name entered.
File Selection Btns
	|>    Select the first file from the file list
	->    Select the next file from the file list
	<-    Select the prev file from the file list
	<|    Select the last file from the file list
This set of file selection buttons allows the user quickly to access the First/Prev/Next/Last SDS file in current data directory.
File Annotation / Raster Image / HDF Info:
	Droplist: File ID & Desc
		  8 Bit Raster Image
		  24 Bit Raster Image
		  Global SDS Attributes
		  Global VDATA Attributes
		  Global VGROUP Attributes
The scrolled info text area is updated according to the droplist option selected by the user. For SDS/VDATA/VGROUP selection the corresponding selection dialog is popped up. The default setting for droplist is the 'Global SDS Attributes'. A user can access and view the desired SDS data set through QUERY - SDS dialog.
If any VGROUP defined in the HDF/NEXUS file, the Global VGROUP Attributes shows the Vgroup structure and allows the user to examine how the SDS data sets are grouped. In case of user doubted any problem with SDS data passed to the subprogram, this feature provided another way of examine the grouped SDS data sets.
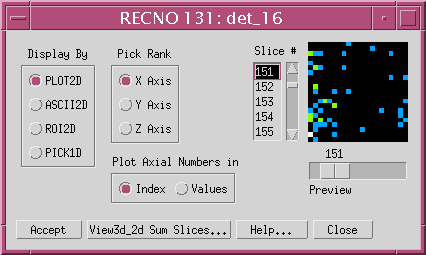
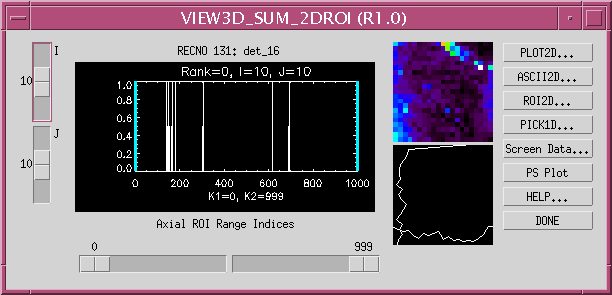
Clear Button - clear the scrolled info area

Scrolled Info Area - display brief file attributes

Check Options:
	Txt Window  - turns SDS text data window  ON/OFF
	Plot Window - turns SDS sub-program plot window  ON/OFF
Which plot window pops up depending on the SDS data obtained, PLOT1D is used for plotting 1D data, PLOT2D is used for plotting 2D data, VIEW3D_2D is used for plotting sliced 3D data.
Byte Array as:
	String    - byte array show as string (default setting)
	Byte      - byte array show as byte value
If the selected SDS data is a byte array, it can be converted to string or kept as a byte array. The default option is converting byte data to string. This takes care the case where string was saved as byte array.
Drawing Area - display coarse SDS raw data
	For 1D SDS data, the line plot is displayed in the drawing area.
	For 2D SDS data, the drawing area is devided into two regions:
		the left region for TV image, the right region for surface plot.
	For 3D SDS data, only the first 12 slices of the 3D data are displayed
		in the drawing area.
For obtaining the real meaningful plot from the sub-program window, a user has to turn the check option for 'Plot Window' to ON.
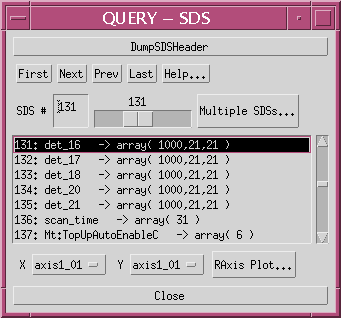
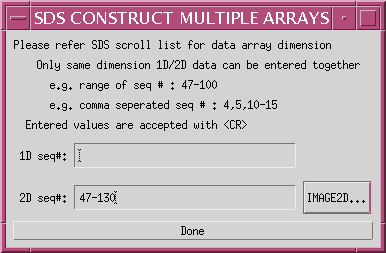
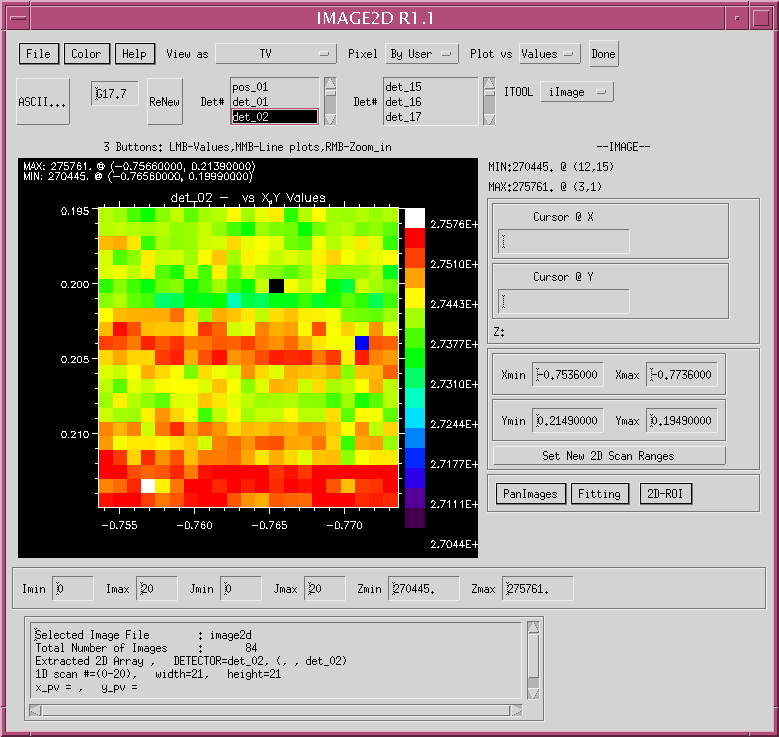
The hdfb assumed that SDS data set with name attribute of 'axis1_01' is an axis. The first name attribute with 'axis1_01' is used for X axis, the second name attribute with 'axis1_01' is used for Y axis. A user has to make sure the correct X, Y axes (i.e. dimensions) are picked for 2D image array before pressing the sub-program buttons like 'RAxis...', 'IMAGE2D...'.DumpSDSHeader Button Display the text window for dumping the summary of SDS data header found from the input file. First,Next,Prev,Last Btns The buttons allow to access the First/Next/Prev/Last data set from the SDS list. SDS # Field The sequence field to display or specify the desired SDS data set. SDS # Slider The slider-bar to display or specify the desired SDS data set. Multiple SDSs... Construct array of multiple SDS 1D/2D arrays, exists only if axis data found in SDS list. SDS Attributes List The scrolled menu list to display the SDS Attribute Names and dimensions. X Axis Droplist The droplist to select X axis, exists only if axis data found in SDS list. Y Axis Droplist The droplist to select Y axis, exists only if more than one axis data found in SDS list. RAxis Plot... Plot axes with real value instead of index value, exists only if axis data found in SDS list. Close Button The button to close the 'QUERY - SDS' dialog.
At the close of 'QUERY - SDS' dialog window, the IDL prompt is returned without blocking, a user can enter any valid IDL interactive command at this time. If a user wants to extract the SDS data array directly from the IDL command line, a user can enter the command 'SDS' at the IDL prompt to access the SDS data array.
The following example shows how to extract SDS data array, and pass the extracted 2D data array 'DATA' to the IDL program 'PLOT2D'.
	IDL> SDS, DATA
	IDL> PLOT2D, DATA
If more SDS data sets are desired from the input HDF file, a user can use different data variable name followed with the corresponding specified keyword seqno=i at the 'SDS' command line, where 'i' is the zero based sequence number, e.g.
	IDL> SDS,FLD1,seqno=1
	IDL> SDS,FLD2,seqno=2
        ...
This SDS command allows the user easily to access any SDS data from the
input file.
 The SDS header file constists of :
	SD #    - order of SDS data seqno
	TYPE    - SDS data type
	NATTR   - number of attributes defined
	NDIMS   - SDS data dimensions
	DIMS    - dimensions list, eg (i,j,k)
	NAME    - name attribute string
	FORMAT  - format attribute
	LABEL   - label attribute
	COORDSYS - coordinate system attribute
	UNIT	- unit attribute
	DATA    - first 6 numbers from the data array
The attribute is left blank if it is not defined.
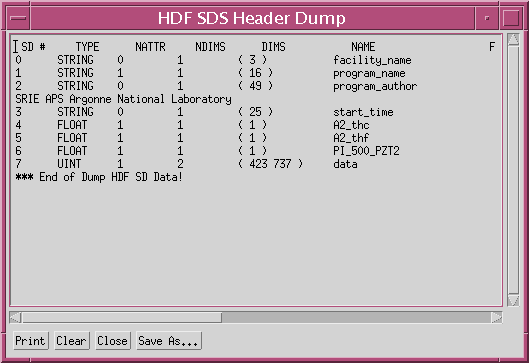
Print - send contents to a printer
Clear - clear the window contents
Close - close this dialog
Save As... - pop up rename dialog
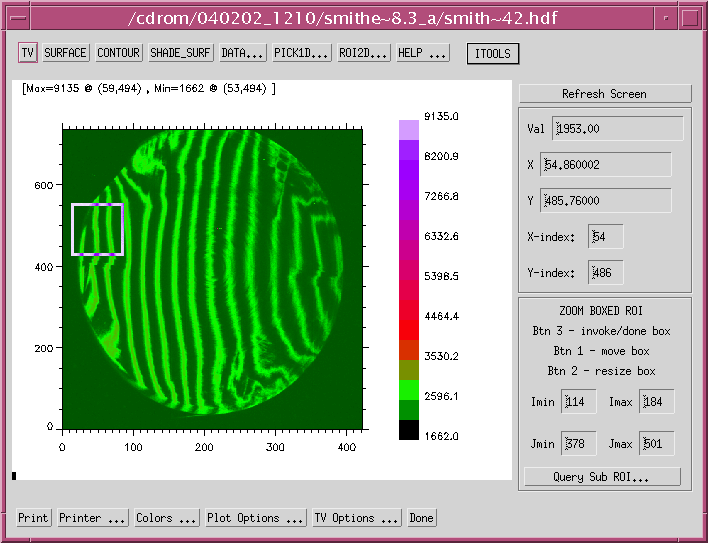
The following PLOT2D image window displays the plot window with 2D SDS
data obtained
from /cdrom/040202_1210/smithe~8.3_a/smithe~42.hdf. The PLOT2D
provides various packaged 2D image processing features,
please refer PLOT2D user's manual for details.
Now a query of zoomed box sub-region is allowed in PLOT2D program.
A user can also use Imin,Imax,Jmin,Jmax fields to specify the ROI.