![[TOC]](gif/back.gif) Command Syntax
Command Syntax
This program can accept the image data in TIF/PNG/JPG/ASCII/XDR format and process the image flexiblely by rotating, reversing, resizing, and extracting rectangular ROI. A user then can use the various features of img program to tailor the image plot according to his desire.
Each TIF, PNG, JPG files are standard image files, which can be 8,16,24 bit images with color tables. For 2D image file, if there is no color table associated with it the default 'Rainbow+White' color table will be used initially, e.g. the XDR, ASCII and 8 bit JPEG 2D images file falls into these category.
Each XDR image file consists of 2D image, plus a vector of 6 numbers: [Xmin,Xmax,Ymin,Ymax,Vmin,Vmax] which defines the geometric and value ranges of the 2D image. The XDR file can be directly generated by view2d, vw2d, image2d, plot2d.
Each ASCII file consists of 2D image data(W,H) only, it contains of W rows of data , each row of data contains of H number of values.
For 8 bit image file, this program can calculate the linear approximate raw data based on the user adjustable input X,Y dimensions and X,Y and Value ranges. The ROI image output can be converted to any format supported by img program.
The plot2d program can be accessed for processing XDR or 8 bit image file. The scan2d_overlay program will be accessed to overlay multiple XDR image files which can have different geometric regions.
The widget window associated with IMG program is readjustable by the window manager.
source /usr/local/rsi/idl_5.5/bin/idl_setupIn order to access IDL programs installed in the local epics/extensions/bin, a user has to make sure that the following two environment variables are set before invoking IDL :
         setenv EPICS_EXTENSIONS /usr/local/epics/extensions
         setenv IDL_STARTUP $EPICS_EXTENSIONS/bin/$HOST_ARCH/viewer_startup.pro
and make sure the directory /usr/local/epics/extensions/bin/$HOST_ARCH is
in his/her IDL search path.
imgThis commnad will automatically load the image.pro, PS_open.pro and xdisplayfile.pro program into the IDL session and with default drawing area size of 400 by 300 pixels.
To access the IMG program from the IDL prompt within the idl session just enter the following command at the IDL prompt:
	IDL> .run PS_open
	IDL> .run image
	IDL> img [,Xsize=400,Ysize=300] [,Group=group]
The menu buttons labeled with the suffix ... indicate there is a window or widgets associated with it.
The drawing area plot dynamically reflects the plot option changes through the interface features selected by the user.
		Open...		- dialog to accept various types of input file
		Printer...	- dialog to override default printer
		Print 		- send drawing area content to the PS printer
		Exit		- exit the img program
The file types accepted by img include '*.tif*', '*.jpg', '*.png', '*.xdr', '*.txt'. The image file acceptable can be any one of the 8/16/24 bit TIF / PNG / JPG file. The raw 2D image data file acceptable can be either ASCII / XDR format (see introduction above).
		Bottom-Up Mirror Image
		Left-Right Mirror Image
		Transpose Image
		--------------------
		Reduce Image by 1/4
		Reduce Image by half
		Expand Image by two
		Expand Image by 1/4
		--------------------
		Extract Image (Scaled)...  	 [redraw image]
		Extract Image (Original)...	 [redraw image in input raw size]
		Extract ROI Only		 [redraw extracted image]
		--------------------
		Color Table...
		Restore Input Color Table
The drawing area image can be reversed bottom-up or left-right, or transposed. The drawing area can be resized by the window manager as well as the reduction and expansion menu items.
Image area can be drawn as scaled or as raw original 2D image size. For the 2D image data the special region of interest can be extracted from the drawing area by clicking the left and right mouse button. The extracted ROI area can be entered by the user through the Extract TV Image calculation dialog (see below). The plot2d program will be used to display the extracted ROI.
Any IDL supported color tables can be loaded into img through the 'Color Table...' dialog. The 'Restore Input Color Table' item restores the original image color table from the input file.
		PNG	- save TVRD image as PNG file
		TIFF	- save TVRD image as TIFF file
		R-TIFF	- save bottom-up TVRD image as TIFF file
		JPEG	- save TVRD image as JPEG file
		PNG	- save raw 2D image as PNG file
		TIFF	- save raw 2D image as TIFF file
		R-TIFF	- save raw 2D image bottom-up as TIFF file
		JPEG	- save raw 2D image as JPEG file
		XDR	- save raw 2D image as XDR file
Overlay2DImages...
		Help...
		Extracted Data...
		File Name...
The 'Help...' item shows the help page for this image process program. The 'Extracted Data...' item gives instruction how to define the ROI use the data extraction dialog. This dialog only works for 2D image data or 8 bit image file. The 'File Name...' item shows the file types supported by img.
		LMB - Left Mouse Button define the lower left corner of ROI
		RMB - Right Mouse Button define the upper right corner of ROI
		MMB - Middel Mouse Button to query X,Y pixels at the cursor
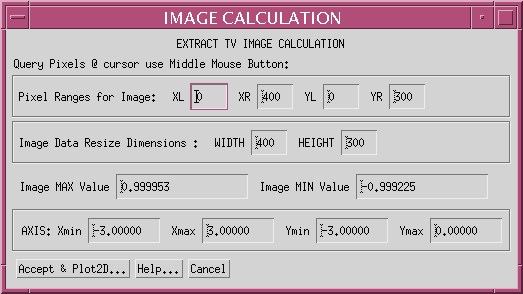
Pixel Rranges for ROI: XL, XR, YL,YR
	Resize Data Dimension:  Width, Height
	Image Value Range :     Vmax, Vmin
	X Axis Range:  		Xmin, Xmax
	Y Axis Range:  		Ymin, Ymax
	Accept & Plot2D...  - Recalculate 2D image array and
				display by plot2d program
	Hlep...		    - Help page about this dialog
	Cancel		    - Close this dialog
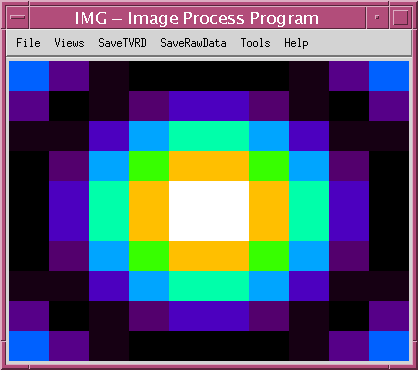
If the original file is a 2D TIFF file, this ROI extraction method can be used to save the new image data as XDR data. With reduced value of Width and Height and without lost of data information, the data reduction purpose can be reached. For example in this document, the image drawing area is 400x300 pixels, but the physical image data dimension is 10x10, the newly calculated image as shown by plot2d which can be saved by the XDR button in plot2d program.