Based on the current file opened it can be either a realtime scanning displayer or saved scan data displayer. If the file opened is an active scanning file (i.e. the scan is not finished yet), then it behaves like a realtime data displayer. If the file opened is an old file saved previously by IOC, then it behaves like a data viewer. A user has the flexibility of switching from file to file during the middle of scanning.
Newer version of scanSee supports up to 85 detectors which can be accessed by the unix script scanSee. If the realtime scanning is going on, scanSee will automatically bring up the SB (scan browser) to display the other old scan data file without interfereing the displaying of the realtime scanning.
Two static stand alone scan browsers can be accessed by scanSee, they are SB and pick3d. SB can access any type of 1D/2D/3D scan file, while pick3d can only access 3D scan data file only.
The static browser provides various plotting and viewing features for accessing
saved data of 1D/2D/3D scan file, i.e., reading whatever data is already
saved in the scan file. No IDL channel access functions are available in
static scan browser, therefore no realtime is possible in SB and pick3d.
scanSee          - Unix script file, it automatically sets up the IDL and
                     runs the DC.pro
		     It is capable of displaying the realtime 1D/2D scan data
		     for 1D/2D/3D scan files.
SB                - Unix script file, it calls the scanSee.pro and
                     operates on any 1D/2D/3D scan files without any realtime
		     functions
sscan             - Unix script file, it calls the sscan.pro and
                     operates on any 1D/2D/3D scan files without any realtime
		     functions ( intend to replace SB)
sscan.pro        - New MDA 1D/2D/2D viewer with more efficient 3D data array reader

read_scan.pro.R2 - IDL routines read the XDR data array saved by the
                     IOC scan software (only used by SB script)

read_scan.pro    - IDL routines read the XDR data array saved by the
                     IOC scan software (used by other scripts except SB)

readScan.pro     - IDL routines read and allocate the 1D/2D data array

DC.pro           - An IDL widget program for displaying realtime scan data
DC.init          - Initialization file used by DC.pro

vw2d.pro         - IDL widget program for displaying 2D scan data only
vw2d.init        - Initialization file used by vw2d.pro

scanSee__define.pro - IDL object methods for processing scanSee data file
scanSee.pro      - IDL widget programs for displaying 1D/2D/3D scan data
                     through using scanSee__define.pro object

pick3d.pro       - IDL widget program operates on the 3D scan file

view3d_2d.pro    - IDL widget program for slicing 2D image array out of
                     any 3D data array

view3d_2dsum.pro - IDL widget program for extracting arbitrary sum of 2D
 		     ROI analysis out of any 3D data array

pick2d.pro       - IDL widget programs operates on any 2D data array
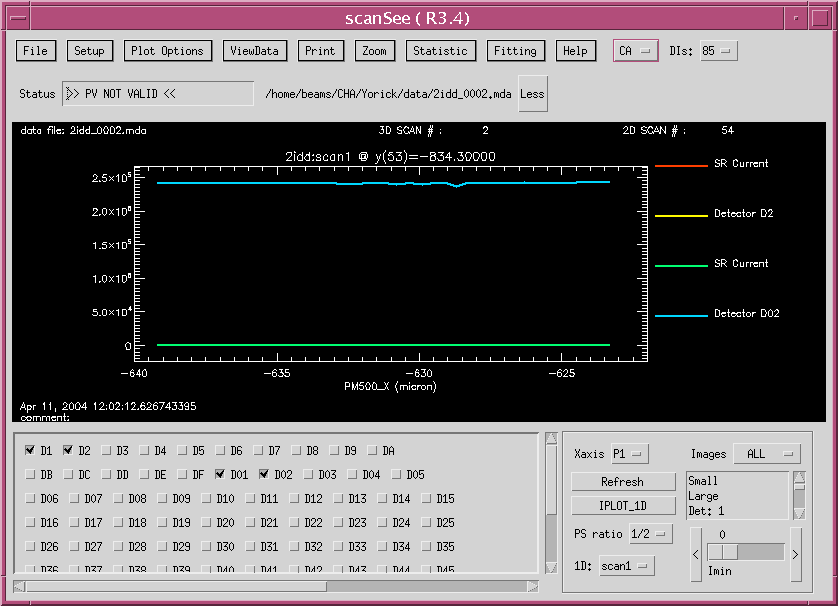
The user interface is briefly described in the following:
File Menu File Menu consists of three entries:
	Open...	   -  pops up mda file selection dialog
	Printer... -  pops up printer set dialog to override default
	Quit       -  closes and exits the scanSee program
Setup Menu Setup Menu consists of seven entries:
	Acquisition	- simulate acquistion On/Off
	Autosave	- not available (automatically saved by the IOC)
	Realtime	- realtime plot On/Off
	TextWin		- realtime listing window On/Off
	Debug		- debug information On/Off
	Scan...		- pops up monitoring 1D/2D scan record setup window
	Color...	- pops up XLOADCT program to change color table
Plot Options Menu Plot Options Menu consists of eight entries:
	Colors		- set lines in Colors or BlackWhite
	Lines		- set different line types or Solid only
	Symbols		- set line style Line only/Symbol only/Both
	Grid		- set Grid lines On/Off
	Err Bars	- set error bars On/Off
	Y Scale		- set Y axis Linear / Y>0 / Log
	Ranges... 	- pop up dialog for setting X, Y ranges
	Labels... 	- pop up dialog for setting plot title and labels
ViewData Menu ViewData Menu consists of four entries:
	1D/2D...	- pops up file # selection dialog
	IMAGE2D...	- calls image2d program directly with 2D image_array
			  (any 2D/3D scans)
	1D_OVERLAY...	- calls overlay_1d dialog to overlay 1D scan arrays from multiple files
	1D_CALIBRA...	- calls calibration_factor dialog to pick vectors from a 1D scan
	1D/2D/3D SSCAN...- calls sscan dialog to view 1D/2D/3D data arrays
Print Menu Print Menu consists of two entries:
	Plot		- send the plot to PostScript printer
	Report...	- pops up report generation dialog
Zoom Menu Zoom Menu consists of five entries:
	Zoom To Box	- zoom box mode
	Zoom In/Out 	- zoom in/out by a factor of two
	Calc Slopes 	- calculate slopes by picking any two points
	Zoom Off	- redraw with autoscaled coordinates
	User Scale...	- pops up dialog for user settable X, Y scale
Statistic Menu Statistic Menu consists of six entries:
	None 		      - no statistics calculation
	Peak/Centroid/FWHM on plot - draw legend of Peak/Centroid/FWHM
	Peak/Centroid/FWHM... - draw legend of Peak/Centroid/FWHM and pops up
			        statistic information window
	FWHM on Y -> One      - draw FWHM of Y for detector one
		     All      - draw FWHM of Y for all detectors
	FWHM on DY/DX -> One  - draw FWHM of DY/DX for detector one
		         All  - draw FWHM of DY/DX for all detectors
	Average/Deviation...  - draw std/ave deviation, mean, variation on plot
Fitting Menu Fitting Menu consists of two entries:
	Fitting... - pops up ez_fit program directly with 1D data array
	1D Binary  - save 1D array as binary data for ez_fit program
Help Menu Help Menu consists of three entries:
	Version... - pops up version info
	Release Note... - pops up release info
	Help... 	- pops up on-line help info
Bypass 3D Menu Bypass 3D droplist Menu consists of two entries:
	YES - No 3D data will be read
	NO  - 3D data read is desired
Status Field The Status text area shows the status of 1D/2D scan setup, reflects realtime # of data point captured, or end of scan.
Filename The full file name label field shows data from which mda file.
Less/More Button The "Less" button shrinks the scanSee window to filename fields and drawing area only. The "More" button restores the normal scanSee window size.
Drawing Area The drawing area is used for displaying the 1D data array for 1D/2D/3D scans. The top line shows the info of the scan: mda scan filename, type and # of scan, line scan #. The plot title shows the data from which scan recrod and the line sequence of the scan data is also shown if 2D/3D is detected. X label and Y label legend name of the line drawn.
The cursor GoTo position dialog can be invoked by clicking the LeftMouseButton in the drawn area.
Detector Buttons Eighty-five detector toggle buttons for selecting/deselecting for plotting.
XAxis Menu XAxis droplist Menu consists of five entries:
	Step #  -  step number as X axis
	P1	-  positioner 1 values as X axis
	P2	-  positioner 2 values as X axis
	P3	-  positioner 3 values as X axis
	P4 	-  positioner 4 values as X axis
Refresh Button This button redraws the 1D scan lines with default setting in viewing mode.
IPLOT_1D Button This button pops up dialog for passing 1D vectors to ITOOL only works for IDL6.X, runtime version only works for IDL6.1 and later.
PS ratio: 1,1/2,1/4 Menu This droplist allows the user to scale down the PS plot.
	1	- normal PS size
	1/2     - scale PS X, Y axis by half (default)
	1/4     - scale PS X, Y axis by quarter
1D: scan1/scanH Menu This droplist allows the user to display 1D vectors from scan1 or scanH record for a 2D scan where scanH is defined for the scan.
	scan1	- 1D vector(s) from scan1 (default)
	scanH	- 1D vector(s) from scanH
Image Types This droplist menu consists of ten entries to control the number of realtime images drwan in the panImage window.
	D01-D10	   - show detector 16 to 25 images in panImage window
	D11-D20	   - show detector 26 to 35 images in panImage window
	D21-D30	   - show detector 36 to 45 images in panImage window
	D31-D40	   - show detector 46 to 55 images in panImage window
	D41-D50	   - show detector 56 to 65 images in panImage window
	D51-D60	   - show detector 66 to 75 images in panImage window
	D61-D70	   - show detector 76 to 85 images in panImage window
	D1-DF	   - show detector 1 to 15 images in panImage window
	ALL	   - show detector 1 to 85 images in panImage window
	NONE       - no panImage window desired
Images List This image scroll list (Small,Large,D1,D2,D3,...,D70) allows the user control the mode of panImage area size used.
	Small	- draw discrete image in 60x60 pixel
	Large	- draw discrete image in 120x120 pixel
	D1      - draw only detector D1 image in 180x180 pixel
	D2      - draw only detector D2 image in 180x180 pixel
	.
	.
	.
	D70     - draw only detector D70 image in 180x180 pixel
Imin Slider Bar This set of widgets controls the 'Imin' slider bar which allows the user to display the image from the index 'Imin' value instead from 0. Both the panimage window and the image2d subprogram will be affected by this setting.
	<       - decrement Imin by 1
	Slider  - Imin slider bar
	>       - increment Imin by 1
	scanSee.zip - Downloading scanSee for IDL 5.3 / IDL 5.4
	scanSee2.5.zip - Downloading scanSee for IDL 5.5
	scanSee3.1.zip - Downloading scanSee for IDL 6.0
Create a scanSee sub-directory and unzip the scanSee.zip in this newly created directory.
If a complete IDL program package is desired instead of scanSee packagke, the gzip file idl2c9.Tar.gz consists of the complete package of various scan data viewers and common 1D/2D/3D displaying sub-programs written in IDL language can be downloaded for the UNIX system.
	idl3_1.Tar.gz - Downloading tar file for UNIX (for IDL 6.0 and EPICS 3.14.X)
	idl2c9.Tar.gz - Downloading tar file for UNIX (for IDL 5.5 and EPICS 3.13.X)
Create a Idl2c9 sub-directory and unzip the idl2c9.Tar.gz in this newly created directory by:
	gunzip idl2c9.Tar.gz
	tar xvfFf idl2c9.Tar
source /usr/local/rsi/idl_5.2/bin/idl_setup
In order to access IDL programs installed in the local epics/extensions/bin, a user has to make sure that the following two environment variables
are set before invoking IDL :
         setenv EPICS_EXTENSIONS /usr/local/epics/extensions
         setenv IDL_STARTUP $EPICS_EXTENSIONS/bin/$HOST_ARCH/viewer_startup.pro
and make sure the directory /usr/local/epics/extensions/bin/$HOST_ARCH is
in his/her IDL search path.
scanSee
This commnad will automatically load the required IDL programs
into the IDL session and run DC.pro with DC.config restart file.
A user than can use the various features of scanSee program to display the data
array.
If no CA monitoring is required and only post scan data viewing is desired, a user can use the Unix script sscan at the unix prompt, for example:
sscanto start the scan browser at the UNIX prompt.
	scanSee.zip - Downloading scanSee for WIN95/WIN98 for IDL 5.3 / IDL 5.4
	scanSee2.5.zip - Downloading scanSee for WIN98/WIN2000 for IDL 5.5
	scanSee3.1.zip - Downloading scanSee for WIN98/WIN2000 for IDL 6.0
Create a scanSee directory and unzip the scanSee.zip in this newly created directory.
Start IDLDE and properly setup the preference with the corresponding startup file, data working directory, and add the scanSee program directory to the IDL search path.
You may use @ezcaidl_startup.win to access the scanSee realtime program.
You may use @go_SB to access the 1D/2D/3D scanSee browser program.
You may use @go_vw2d to access the vw2d program.
You may use @go_pick3d to access the pick3d program.
Unfortunately the file name system is limited on WIN, the file name is shortened by the WIN system. And a user has hard time to figure out the scan number from the shortened name on the WIN. A user has to examine the SEQNO field displayed on the WIN system and modify the external file name such that the correct number of scan is used in the file name. The WIN does not allow the character ':' in the file name, it should be removed in updating the file name on WIN.
In order to use the First, Next, Prev, Last buttons in the IDL programs, the file name has to be manually converted to statisfy the following rule which consists of prefix, sequence number, and suffix '.mda'
prefix_xxxx.mda
where xxxx is the same 0 padded sequence number corresponding to the number
used on the UNIX system.
If you dont want touch the file name, you have to always use the File->Open to select the file.
The primary differences of scanSee from the data catcher are given below.
In theory that the user never need to worry about scan not been properly saved due to malfunction of the UNIX system.
SSCAN Object Reference Guide This document shows how to use class object method for accessing scan MDA data directly saved by the IOC software.
Following examples show step by step procedure of user interface how to load the scan file into insight. Where scan file is automatically created by the scan software resides on the IOC. Currently, only 1D and 2D scan are supported.
The system consists of three files, readScan.pro, dc2ins_1d, and dc2ins_2d. At APS, they are installed in the /usr/local/epics/extensions/bin/solaris directory.
readScan.pro	- consists of a set of routines for accessing
		  1D/2D scan data saved by the IOC scan software.
dc2ins_1d	- IDL script written for accessing a single scan line
		  out either a 1D or 2D scan file
dc2ins_2d	- IDL script written for accessing 2D image data out of
		  a 2D scan file
In addition of EPICS_EXTENSION the following environment variable must be set: setenv EPICS_EXTENSION_PVT ~cha/epics/extensions
Example 1 - Extract data from a 2D file
=======================================

idl				; invoke unix IDL program
IDL> file='/home/sricat/CHA/data/rix/cha:_0001.scan'

	where 2D image file was created by the IOC, each file consists of only
	1 set of scan data either 1D or 2D scan.

IDL> img_no = 2 			; valid img_no is [1-15]

IDL> @dc2ins_2d

	Window: 'Getting started with insight...'
		Select 'New Project'
		Press  'Ok' button

	Window: 'Select Data to Import'
		Press 'IDL Variables...'  button

	Window: 'Import IDL Variables'
		Press 'All' button
		Press 'Ok' button

	Window: 'Select Data to Import'
		Press 'File...' button
		Select 'tmp.txt' from the file selection box
		Press 'Ok' button

	Window: 'Select File Format for Import'
		Press 'Define and Read ASCII...' button
		Comment String to Ignore: ;
		Press 'Next>' button
		Press 'Next>' button
		Press 'Finish' button

	Window: 'Select file for File Plugin...'
		Press 'Cancel' Button


	Window: 'Select Data to Import'
		Press 'Ok' button

	Window: 'Insight'
		File->Data Manager
		Visualize->Image...


	Now both image and corresponding 1D scan data are loaded
        into insight, you should be able to use insight to do
	whatever you desire visualization or analysis for both
	1D and 2D data.

	Note: the following variables are defined

	field1   - 1st scan line from detector image   ;  same as IM(*,0)
	field2   - 2nd scan line from detector image   ;  same as IM(*,1)
	field3   - 3rd scan line from detector image   ;  same as IM(*,1)
	.
	.
	.
	FILE     - 2D scan file name
	IM       - detector 2D image array
	IMG_NO   - selected detector number, default to 2
	SCANNO   - 2D scanno of the file
	X        - positioner 1 vector of scan1 database record
	Y        - positioner 1 vector of scan2 database record
	XDESC    - descrition string of X
	YDESC    - descrition string of Y
	XPV      - pvname of 1D scan database record
	YPV      - pvname of 2D scan database record


Example 2 - Extract data from a 1D/2D file
==========================================

IDL> file='/home/sricat/CHA/data/rix/cha:_0000.scan'
IDL> seq = 1         ; seq = 1 for 1D file , seq >= 1 for 2D file

IDL> @dc2ins_1d

	Window: 'Getting started with insight...'
		Select 'New Project'
		Press  'Ok' button


	Window: 'Select Data to Import'
		Press 'IDL Variables...' button

	Window: 'Import IDL Variables'
		Press 'All' button
		Press 'Ok' button

	Window: 'Select Data to Import'
		Press 'File...' button
		Select 'tmp.txt' ASCII file

	Window: 'Select File Format for Import'
		Press 'Define and Read ASCII...' button
		Comment String to Ignore: ';'
		Press 'Next>' button
		Press 'Next>' button
		Press 'Finish' button

	Window: 'Select file for File Plugin'
		Press 'Cancel' button

	Window: 'Select Data to Import'
		Press 'Ok' button

	Window: 'Insight'
		File->Data Manager
		Visualize->Scatter Plot

	Now you should be able to use insight to do whatever you desire
	visualization or analysis.

	Note: the following variables are defined

	field1   - scan line for detector 1   ;  same as Y(*,0)
	field2   - scan line for detector 2   ;  same as Y(*,1)
	.
	.
	.
	FILE     - 1D or 2D scan file name
	SCANNO   - scan number of the file
	SEQ      - selected 1D seq number from the file
	X        - positioner 1 vector
	XDESC    - X description label
	Y        - 2D array corresponding to defined detectors
	YDESC    - Y description label