For easy start of yca with file selection user interface, the frontend file selection box is simplely implemented by calling the python/Tkinter file selection widget. Therefore, the software package python/Tkinter is also required.
Yorick 1.5 Package
Yorick 1.5 and library release is required for compiling and running yca.Yorick is an interpreted programming language, designed for postprocessing or steering large scientific simulation codes. Yorick includes an interactive graphics package which is completely free and it is very efficient, and a binary file package capable of translating to and from the raw numeric formats of all modern computers.
More information about Yorick documents and software download can be found from Yorick
Epics Extensions Yca Package
The instruction for downloading and compiling Yca for UNIX system is given here.1) For unix system, at the epics/extensions/src directory mkdir ca mkdir Yca 2) Download the Lca.zip file and extracted in the ca sub-directory cd ca unzip Lca.zip gnumake 3) Download the Yca.zip file and extracted in the Yca sub-directory cd Yca unzip Yca.zip 4) Modify Makefile.yca to reflect the library path version # on your Unix system vi Makefile.yca 5) Create yca program make -f Makefile.yca 6) Install yca to epics/extensions directory gnumakeThe yorick programs will be installed under epics/extensions/yoricklib directory. The color table files will be installed under epics/extensions/gistlib library. The script program and executable will be installed under epics/extensions/bin/solaris directory.
	yoricklib/
		ascii.i
		b_read.i
		catcher.i
		createP.i
		custom.i
		demo2.i
		loadct.i
		panimage.i
		realtime.i
		scanSee.i
		surface.i
		yca.i
		yscan.i
	gistlib/
		cl21.gp
		cl39.gp
		rrainbow.gp
		work1.gs
	bin/solaris
		yorick_setup
		yca
		yo.py
		runyca
		asciiRpt
		asciiRpt.py
		yviewer


	7) Test yca program in Yca directory
	yca			// start yca program
	help,yca 		// list all functions in yca.i
	help,caget		// get caget command syntax
	help,yscan		// list all functions in yscan.i
	quit			// exit yca program
Access Yca Software Package
For general EPICS users, the instruction for setting up and running yca on the UNIX system is given here.1) Make sure /usr/local/epics/extensions/bin/solaris is in your search path, and /usr/local/epics/extensions/lib/solaris is in your LD_LIBRARY_PATH 2) Run the setup script, it will create ~/Yorick and ~/Gist directories and makes necessary file links for user (you only need to do once before any Yorick application) yorick_setup 3) Create the data sub-directory and download the sample test data ydata.zip file and extracted in the data sub-directory mkdir ~/Yorick/data cd ~/Yorick/data unzip ydata.zip 4) Run yca as interpreter cd ~/Yorick yca Staring yca this way, a user can load any yorick program written by him/her self. It allows the user to access any yca functions. 5) Access packaged catcher/scanSee program by any of the following methods a) By UNIX script "runyca" automatically run the yorick yca and python yo.py runyca b) Directly read in scan file name on "yca" command line: cd ~/Yorick yca data/2xfm_0020.mda Legal files accepted on the command line yca can be either scanSee *.mda , catcher 1D, or catcher 2D image filesIf there is a configuration file "yca.config" file found in the startup working directory, the yo.py program will start the yca visualization function immediately depending on the type of input file picked.
Yca User's Guide
The yca.i and yscan.i yorick programs are automatically loaded into the yca. It allows the user to access the channel access caget/caput/caScan functions. The following Yorick programs are dynamically loaded into yca by the custom.i file. If user want to load his own yorick function into yca he may create a private version of custom.i file and modify the custom.i program accordingly.loadct.i panimage.i demo2.i surface.i b_read.i ascii.i catcher.i scanSee.i realtime.iEach pop-up dialog window is simulated by Yorick push buttons. Each dialog window runs sequentially until it is closed by the done button, then click another button from the parent window to pop up a new child window or close the parent window.
The interactive yca prompt is ">", the yca is normally terminated by entering the 'quit' command at the prompt.
Command Syntax
It is assumed that the user already run yorick_setup previously. If a user only want to run yca as a scan browser then simply try the UNIX script runyca command.To start the yca as an interpreter:
	cd ~/Yorick
	yca
A user can always try to use the help command to query the command syntax about a known function name defined in yca. A user can use help to query any one of it about the command syntax listed below. For example,
> help, cagetFor normal termination of yca use
> quitTo use "CNTL-C" stop a function execution if it takes unexpected long time to execute, yca will return the command prompt > to user. In case of yca hang up and the user can not stop the execution a user can use the "CNTL-\" to kill the yca interpreter.
yca.i functions
The yca.i contains a collection of custom build yorick channel access functions. It includes the following additional built in functions available in yca. A user can use help to query any one of it about the command syntax listed below.cagetCount - get the number of elements cagetWave - get the wave form record caputWave - put the wave form record cagetString - get the string value(s) caputString - put the string value(s) caget - get the double value(s) caput - put the double value(s) cagetAll - get the value, status, severity values caSearch - search the pv name caSearchList - search a list of pv names caMonitorAdd - add PV to monitored list caMonitorClear - clear the monitored PVs caMonitorGetEvent - get event array of monitored PVs caMonitor - add/clear/get the PV monitored caTimeStamp - get the time stamp when the PV value changed
yscan.i functions
The yscan.i contains a collection of custom build yorick scan functions. It includes the following additional built in functions available in yca. A user can use help to query any one of it about the command syntax listed below.
        caScanDef       - get the vector for defined positioner and detector
        caScanPvnames   - get the pvnames for defined positioner & detector
        caScanVals      - get the readback and data arrays from the scan record
        caScanPlot      - plot the data arrays versus P1
        caScan          - help on the procedure of getting scan values
        caScanAdd       - set monitor on scan record
        caScanClear     - clear monitor on scan record
        caScanGet       - get the intermediate,temporary scan data arrays
loadct.i functions
The loadct.i contains a collection of custom build yorick color graphic functions. It includes the following additional built in functions available in yca. A user can use help to query any one of it about the command syntax listed below.xloadct - pops up the color table setup window dialog colorbar - draw color bar on current graphic window rpalette - convert color table to reverse order loadct - set the color table to be used hcp_open - specify hard copy file to be used hcp_add - append the graph to hard copy output file hcp_close - close hard copy device plh - histogram plot tv or TV - plot 2D image array logplg - log y plot box - set plot region frame box option erase - create / erase graphic window hqg - turn on/off high quality graphic output
b_read.i functions
The b_read.i contains a collection of custom build yorick binary read and write functions. It includes the following additional built in functions available in yca. A user can use help to query any one of it about the command syntax listed below.b_ptr - find pointer array for binary data object byte2str - convert byte array to string array str2byte - convert string array to byte array b_read - read a binary object from the binary file b_append - append a binary object at the end of binary file b_write - write a binary object at the specified offset position b_update - replace the old binary object by the new object at the specified position size - return the size information about a binary object xdr_read - simulate the IDL's XDR_READ routine xdr_write - simulate the IDL's XDR_WRITE routine cmdPipe - returns unix system command output mdaowner - find the owner of the mda file finduser - find the USERID of the current user bread - read a data array object from the binary stream bread_str - read a string object from the binary stream delvar - delete a defined varible from yca defkey - extract keyword string from command_line string bkup_file - backup a file with suffix ".bk"
panimage.i functions
The panimage.i contains a collection of custom yorick image processing functions. It includes the following additional built in functions available in yca. A user can use help to query any one of it about the command syntax listed below.
pickimageDialog - dialog for picking 2D image from catcher image file
calc_limits - calculate new plot limits for a graph window
linetype - dialog window for plot1d modification
replot - modify plot1d graph through calling linetype
plot1d - multi-lines 1D plot routine
showhide - show or hide a plotted curve
panimage - dialog for thumb nail image selection
ascii2im - construct image array from a ascii file created by
im2ascii
ascii2im - construct image array from a ascii file created by
im2ascii (read scanSee generated image ascii file)
im2ascii - overwrite/append the image data to an ascii file
tv_query - plot 2D iamge data with option of query data on
the yca output terminal
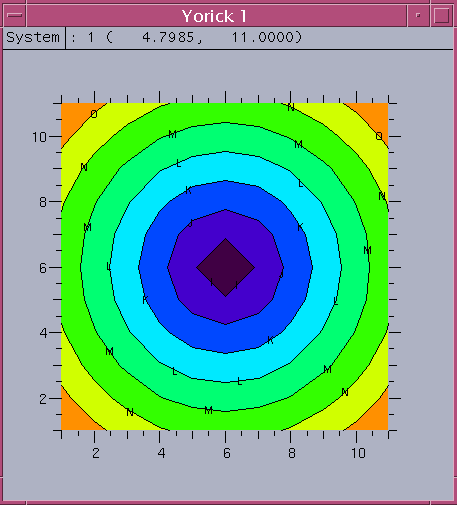
IMD_plc - contours plot of 2D image data
plot2ascii - extracted plot data to ascii file
pl3d - 3D surface plot extracted from demo2.i
IMD_im - contours plot with index axes
surface - 3D surface plot of 2D image data
readasciiHD - bypass comment line at the beginning of file which
begin with "; "
readascii1D - read ascii 1D text file generated by scanSee
readasciiDA - read sscii data array generated by writeasciiDA
writeasciiDA - overwrite/append data array to text file
strtoks - extract tokens from an input string
catcher.i functions
The catcher.i contains a collection of 1D/2D data catcher scan data processing functions written in yorick. It includes the following additional functions available in yca. A user can use help to query any one of it about the command syntax listed below.catcher2d - dialog extract all 2D images from a catcher image file catcher2d_read - read the specified set of image from 2D image file writeCatcherImage - append a set of image data to a specified image file readCatcherImage - extract the specified image from a catcher image file pickimage - dialog to pick 2D image catcher2d_checkfile - check whether input file is 2D image file catcherimage_ptr - find offset position array of all images u_dump - dump portion of binary data from a binary file padz - return padded char array to meet word size of 4 u_write - append a data object at the end of binary file u_read - read a data object at specified offset of binary file catcher1d_ptr - find offset position array of all 1D scans catcher1d - dialog for picking 1D catcher data catcher1d_data - read and populate 1D data from input offset position catcher1d_extract - extract 1D scan from src file, put to a dest file catcher1d_write - write a set of 1D scan data to a binary file catcher1d_read - read a set of 1D scan data from opened file stream catcher_quit - update yca.config and quit yca catcher_report1D - generate 1D catcher ascii report file catcher_report2D - generate 2D catcher ascii report file catcher_fixfile - trancate binary file with known offset position
scanSee.i functions
The scanSee.i contains a collection of 1D/2D/3D scan data processing functions written in yorick. It includes the following additional built in functions available in yca. A user can use help to query any one of it about the command syntax listed below.scanSee_setprinter - override default printer scanSee_file - access the new file through file number scanSee_rand - find out the rank of mda file scanSee_read - a scanSee file reader only required for 1D/2D scanSee_read3D - a 3D scanSee file reader for 2D image array scanSee_read2D - read all 2D scan data for a given 3D scan seqno scanSee_read3DAll- read whole 3D scan data set including inner most array scanSee_3DimagesPick - use panimage to slice out 3D spectrum data array scanSee_3Dimages - inner most detector images slice out of 3D data array scanSee_images - extract 2D or 3D panimages for 3D scan scanSee_readENV - read extra PV values if detected scanSee_readHeader - Extract scan record header information scanSee_read1D - Extract 1D data array from 2D/3D file scanSee_1D - Extract 1D data array from 2D file only scanSee_panimage - dialog to pick and view detector image array scanSee_ascii1D - create 1D ascii file scanSee_print - call plot1d to plot all detectors defined scanSee_view1D - dialog for selecting 1D scanno and replot scanSee_TV - plot selected 2D image data scanSee_2Dascii - generate 2D ascii image data scanSee_3D - dialog for processing 3D scan data scanSee_replot - dialog for 1D plot modification scanSee - frontend for mda file visualization scanSee_view2D - dialog for selecting 2D panimage data scanSee_info - generate 1D plot data info scanSee_calcfile - dialog for calculating next file check_fileOK - dialog for check whether to read the 3D file scanSee_quit - update yca.config and with quit option scanSee_write3D - read in 3D mda file and save data arrays in a XDR file findfile - check for file existence, return 1 found, 0 not found
ascii.i functions
The ascii.i contains a collection of ascii report generation functions for scanSee type mda file. Where appropriate the Unix openwindow tool textedit is used to display the ascii file created.scanSee_report - driver to generate 1D/2D ascii report scanSee_1Dreport - generate 1D ascii report scanSee_2Dreport - generate 2D ascii image report scanSee_report2DAll - generate ascii report for all selected images
realtime.i functions
The realtime.i contains a collection of functions controling and viewing 1D/2D realtime scanning for catcher or scanSee data file.scanSee_Scan - dialog for starting scanSee realtime scanning scanSee_realtime - display and redraw realtime 1D/2D data window catcher_save1Dscan - save 1D scan data in catcher format catcher_2dScan - start 2D scan and save 1D/2D catcher data catcher_1dScan - display 1D realtime scanning and save 1D data catcher_scanHeader - setup realtime data structure before scanning catcher_scanCreate - create new 1D catcher file with new 1D scan catcher_scanAppend - append 1D scan to an existing 1D catcher file catcher_checkfile - check whether 1D catcher file picked catcher_scanDialog - dialog for starting data catcher user interface
Config File
If the yca is started by the script runyca or by python program yo.py the "yca.config" file will be used to restart the yca. The contents of "yca.config" consists of two lines: first line is the input scan file name with full path and the second line gives the file path where all the scan files located.If the configuration file is found, it will run yca directly with the found file. If the configuration file is not found, it will start with file selection dialog to let user manually to select the file. The legal file is either catcher 1D/2D or scanSee 1D/2D/3D mda files.
The "Open" and "Up" buttons in python program yo.py allows the user navigate through the file system to pick the desired input file. If wrong type of input file is picked, the info window and the file selection will be popped up again.
The file selection dialog in yo.py is terminated by clicking the "Cancel" button on the file selction dialog.
Scan Files
Three types of scan files can be accepted by yca command. Yca starts scanSee program if the input file is ended with ".mda", it starts the catcher 2D image program if the input file is ended with ".image", otherwise it assumes that the catcher 1D input is entered.For a omplete list of legal commands acceptable by the yca/yorick program please refer the original document at Yorick site.
Examples of Yca
Few examples of yca command application are given below:
1. Start with any catcher 1D filename on command line

	yca filename

2. Start with any catcher 2D filename.image on command line

	yca filename.image

3. Catcher 1D/2D commands available within yca:

	catcher1d,"filename",ptr          	// access 1D plot
	replot					// modify 1D plot

	catcher2d,"filename.image",ptr		// access 2D panimage data
	xloadct				 	// try different color table

	pickimage,"filename.image",ptr 		// access image # data

4. Start with any scanSee 1D/2D/3D filename on command line'

	yca filename.mda

5. Start the script "yo.py" to use the python file selection dialog to pick
	catcher or scanSee data

	yo.py

6. During query the image data form the panimage window 3, the
   mouse control is controlled by window 0,

	left mouse - query the image data, the x,y,z values will be
		     printed in yca interactive terminal
        right mouse - stop the query, the mouse control return to
			window 3
Yca Dialogs Interface
Yorick does not have fancy widget object, only button object and mouse function are available for event control. So all the yca dialog currently is simulated by using the button object. Great effort is done in keeping yca user interface as simple and as efficient as possible.Because of lacking of slider object in yorick, the slider button is simulated in yca to accomplish the sliding effects. The sliding button is marked as "1...N", it can be any value of 1 to N which depends on location user clicked within the button. Click the left most edge of sliding button implies the first number picked, Click the right most edge of sliding button implies the last number picked. The actual number picked by clicking the relative position on the button is scaled according to the range of number represented by the button. The sliding button has been heavily used in yca to determine the number of sequence picked by user.
There are at most seven windows can be used by yorick. The control button is functioning seqentially, a user can not jump arbitrarily from window to window in yca. It is controlled by the logic of the yca program. Normally the mouse control is grabbed by the child window if there is push button in the child window. The child window must be closed appropriately before the control can be passed back to the parent window. Very often if the mouse is not functioning in a window, very likely the control is grabbed by the child window.
In the future upgrade the user interface will be implemented as much as possible by using the python/Tkinter widget programming.
The user interface of Yca dialog windows is briefly described below.
Tkinter File Selection Interface
The file selection is implemented by the Tkinter file selection dialog. It allows the user navigate through the file system with easy. A startup configuration file "yca.config" is used to let user easily to restart the yca with the last file examined by user.
Common 1D/2D Interface
Common 1D/2D interface functions are identified, and they are implemented such that they can be reused by general purpose yca applications. The common routines are listed below:panimage selection dialog
A panimge dialog is implemented such that any array of 2D image arrays can pass into this program and let user click the thumb nail image to pick the desired image to view data, generate PS hard copy, or ascii image data. Panimage will try to pack the whole array into the n^2 square drawing areas. For very big array the thumb nail images will be very small. A typical panimage dialog is shown here.
  COMMOND SYNTAX

	panimage, array [,arout]  [,no=] [,all=] [,detname=] [,title=] [,fn=] [,dialog=]

	Generate a thumb nail images from the input image array. It
	allow the user to select desired image from the thumb nail images.
   INPUT:
	array - specify input image data array(wd,ht,num)
		image with wd x ht dimension , with num of images in array
	arout - optional output, return the resultant 2D display image array
   KEYWORD:
	no    - specifies the number of images per row for 2D panimage display
	all   - specifies the output ascii file name for whole panimage array
	detname - specifies the detname to be displayed instead of seq #
	win   - specifies the window number to be used
	title - specifies the title
	fn    - specifies the filename of data extracted
	dialog - if specified no button interface desired

	Use Yorick window 3 for panimage, 1 for surface and contour
	Use win for displayinge the selected image
	'Ascii'        - generate ascii report, default '1.txt' is used
			 if keyowrd all='new.txt' file is specified
	'Polka'        - send PS to printer Polka
	'Print'        - send PS to default printer
	'Q Yorick 1'   - get into query the Yorick 1 image pixel value
	'Done'  - close the panimage window yorick 3
	'Xloadct - use window 4 to load color table to widow 0 and 1
	'Contour - generate contour plot for selected image
	'Surf Ms - generate surface mesh plot for selected image
	'Surface... - pops up child surface dialog for the selected image
	mouse button 1 - pick the thumb image to pop up window yorick 0
			 follows with click  the  'Q Yorick 1'
			 mouse button 1 in Yorick 0 window to query
			 mouse button 2/3 terminates query
       Note: if problem encontered in press mouse,
             tried to use CNTL-C to break out the problem mode
surface dialog
The surface dialog allow the user have great flexibility of getting surface or contour plot for input image 2D array. The viewing angles theta and phi slide from -90 to 90 degrees. The increment and decrement arrows allows the angle change by 3 degrees for each mouse click.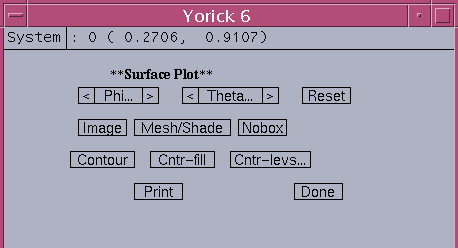
	Phi..      - viewing angle phi slider 0 to 180 degree
	Theta..    - viewing angle theta slider 0 to 180 degree
	<          - decrement with 3 degrees
	>          - increment with 3 degrees
	Reset      - reset phi=30, theta=60
	Image      - display 2D image in window 1
	Mesh/Shade - set color shade off/on
	Nobox      - do not draw bound coordinates
	Contour    - draw contour line plots with 8 levels
	Cntr-fill  - contour filled with color with 8 levels
 	Cntr-levs  - contour level slider from 5 to 25
	Print      - generate PS output, use gv to view PS output
	Done       - close the dialog, return to calling parent
plot1d modification dialog
The plot1d command will generate a multi-line 1D plot on window 0. A typical 1D multi-line plot is show here.
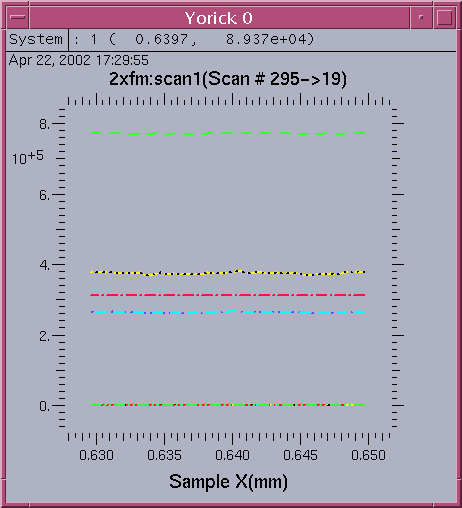
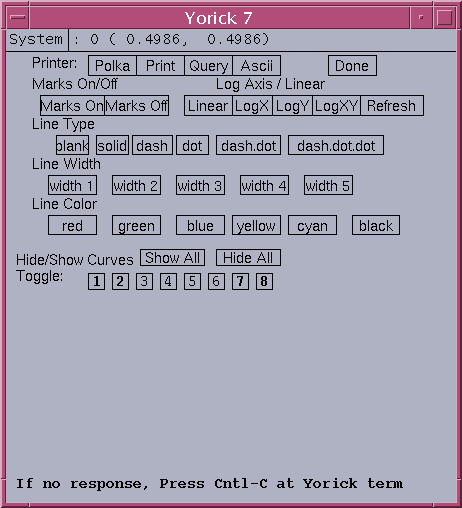
   COMMAND SYNTAX

	plot1d, ya, xa [,win=] [,title=] [,xtitle=] [,ytitle=] [,legend=]
		[,timestamp=] [hide_def=]

	This func can plot multiple lines in a 2D cartesian coordinate
   INPUT:
	ya(num_pt,nc) - input array, ya, gives the data curve array to be
			plotted, nc gives number of 1D curves in ya
	xa(num_pt)    - optional input, xa gives the x vector value,
			num_pt gives data points in each curve
			default to indgen(num_pt)
   KEYWRODS:
	win           - yorick window number, default 0
	title         - string to specify the plot title
	xtitle        - string to specify the xtitle
	ytitle        - string to specify the ytitle
	legend(nc)    - string array to specify the legend of curves
	timestamp     - string to specify the timestamp associated with data
	hide_def(nc)  - int array to indicates whether each curve to be
			displayed initially, 0 show, 1 hide
The total number of Toggle buttons is same as the number of detectors defined in scan1 record. By default, initially the detectors 1,2,16,17 in the data array "ya" are plotted in the graph. If the total number of detectors defined is less than 16, the last 2 detectors are plotted instead of 16,17. The linetype command can be used to modify the multi-line 1D plot. It allows the user to show/hide the lines, change line width, color, type texture, send output to printer, view ascii data, etc. Currently, it is target for at most 85 lines. An example of linetype dialog of total 80 lines in the 1D array is shown here.

   COMMAND SYNTAX

	linetype, type, width, color, mark [,win=]

	Dialog for modifying line characteristics for the next line plot.
	The initial graph must be created by the plot1d command.
   INPUT:
	type   - return line type used in curve plot, initial 1
	width  - return line thickness, initial 5
	color  - return line color used, initial "black"
	mark   - return mark on/off, initial off
   KEYWORD:
	win    - plot window number, default 0

   Buttons used in linetype dialog:
	Polka - route PS plot to Polka
	Print - send PS plot to default printer
	Query - list plot info on yca terminal
	Ascii - use textedit to display plot data
	Done  - close the dialog
	Line characteristic control buttons:
	Marks - on/off button
	Axis  - Linear,LogX,LogY,LogXY
	Refresh  - redraw with default options
	Type  - blank,solid,dash,dot,dash.dot,dash.dot.dot
	Color - click color button override the default cyclic
		     red,green,blue,yellow,cyan,black for selected line
	Hide/Show Curves
	Hide All - hide all 1D curves
	Show All - show all 1D curves
	Toggle button #'s - bold letter # implies curve is plotted
xloadct dialog
The xloadct command let the user to load the color tables currently supported at APS. The default color table used by yorick is "earth.gp". The default color used by catcher and scanSee is rainbow plus white, "cl39.gp". New color palette can be created by dump_palette, an example is given in "createP.i"
  COMMAND SYNTAX
	xloadct
catcher Interface
1D_Scan_selection
The catcher1d command let user to use scan number dialog to select 1D scan from an input catcher 1D file. The 1D scanno slider allows the user randomly click the relative position on the slider bar to pick from first to last scan.
   COMMON SYNTAX

	catcher1d,filename [,ptr] [,scanno]

	This func allows the user to use window 6 to select the desired
	1D scan from the input catcher 1D file. By default all the 1D
	data lines are plotted.
	Ascii button - Update 1D ascii data file "1.txt" with the selected
		       1D scan #
	Append button - Append the selected 1D scan # ascii data to existing
		       "1.txt"
        Modify... button - popup dialog for 1D plot modification
        Done button   - Close the catcher1d select dialog
        <             - select previous (decrement) scanno
        1D Slicer...  - simulate scanno slider button
        >             - select next (increment) scanno
        Numbered button - scanno selection
  INPUT:
	file   - specify 1D catcher file
  OUTPUT:
	ptr    - return 1D scan offset positon array
	scanno - return the 1D scan number currently picked
  SEE ALSO:
	'linetype' func for interactively modify the 1D plot or access
                 various plot options
2D_Image_selection
The pickimageDialog command let user use the flexible image sequence number dialog to select the desired image from the input catcher image file.
  COMMOND SYNTAX

	pickimageDialog, file, ptr  [, exit=]

	A dialog for selecting image from catcher 2D image file.  Before
        calling this function the ptr array must be known already.
   INPUT:
	file - specify the catcher 2D image file
	ptr  - pointer array at the beginning of each set of image data
   KEYWORD:
	exit - if it is specified,  exit of yca is implied

   Buttons used in this image selection dialog:
	Ascii - generate and view 2D ascii file "1.txt" for selected image
	Polka - route PS output to polka printer (window 0 & 1)
	Print - send PS output to default printer (window 0 & 1)
	AppendAscii - append the selected image data to ascii file "1.txt"
	Contour - plot image contour in window 1
	Surface - plot surface plot in window 1
	Done  - close image selection dialog
	Image # selection buttons:
	<=	- previous image seqno (decrease 1)
	=>	- next image seqno (increase 1)
	PanImages - popup thumb nail panimage dialog for image selection
	Phi     - slider H-rotation angle phi 0 to 180 degree
	<, >    - phi angle increment, decrement buttons
	Theta   - slider V-rotation angle theta 0 to 180 degree
	<, >    - theta angle increment, decrement buttons
	Numbered buttons - specify image seqno found in file
image

surface

contour
scanSee Interface
For scanSee different dialog window pops up depending on the rank of scan detected. It is assumed that the scanSee file all ended with file type ".mda" and they are automatically saved by the IOC. To invoke scanSee dialog:
    COMMAND SYNTAX

        scanSee, fn [,exit=]

        Start scanSee dialog with input mda file.
	Different dialog windows pop up according to the rank of scan detected.
   INPUT:
        fn   - 1D/2D/3D scanSee mda file
   KEYWORD:
        exit - if specified, exit of yca is desired at the endo of dialog
scanSee_1D dialog
For 1D scan detected, the linetype modification dialog and the plot1d graph window are both automatically pop up for users. The number of buttons drawn for Show and Hide indicates exactly how many curves (or detectors) defined in the scan1 record detected. A typical example is shown below, there are 8 detectors defined in this case.
scanSee_2D dialog
For 2D scan detected, it pops up 3 windows: window 0 for showing TV image or 1D line plots, window 1 for showing contour or surface plot, and window 5 for view1D/2D dialog. Window 5 dialog consists of three buttons: PanImages, View1D, Done and a label showing the filename picked.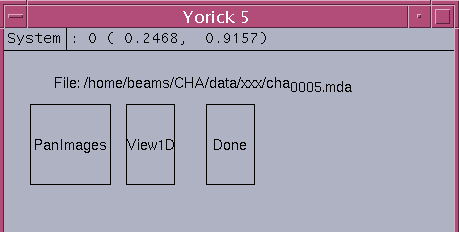
	PanImages  - call scanSee_view2D to pop up panimage dialog to select
		     the desired 2D image
   	View1D     - pop up scanSee_view1D dialog to select 1D scan data
   	Done	   - close the view 1D/2D dialog with the option of quit yca.
scanSee_view1D dialog
The 'View1D' button will pop up the scanSee_view1D dialog. A typical example is given below: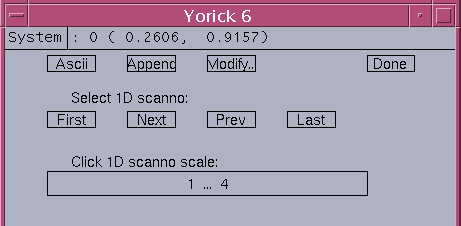
	Ascii - generate 1D ascii data for selected 1D scanno
	Append - append 1D ascii data to "1.txt"
	Modify... - pop up linetype modification dialog
	Done      - close the scanSee_view1D dialog
	First     - access the first set of 1D scan
	Next      - access the next set of 1D scan
	Prev      - access the previous set of 1D scan
	Last      - access the last set of 1D scan
	1...#     - 1D scanno slider scaled 1 to last scanno #
scanSee_view2D dialog
The 'PanImages' button will pop up the scanSee_view2D dialog. A typical example is given below:A user can click any image icon to pick the desired image, the image in window 0 will be updated according to user pick. At the end a user should click 'Done' button to close the panimage window. Then the control pass back to the calling window.
scanSee_3D dialog
For 3D scan detected, it first will ask user whether the inner most spectrum data array to be read or not. The default setting is no 3D data set to be read in. If no data is read in at all the program will close by itself.
For the case where 3D data array are read in, it pops up 3 windows: window 0 for showing TV image or 1D line plots, window 1 for showing contour or surface plot, and window 5 for scanSee_3D dialog.
COMMAND SYNTAX scanSee_3D,fn [,exit=] Pop up 3D scanSee dialog. INPUT: fn - 3D scanSee mda file KEYWORD: exit - if specified, quit yca at the close of dialogButtons defined in scanSee 3D dialog: - Pick 3D Images: I/J/K: 1...# - pick I/J/K index value (slider: rank 1/2/3 dimension) which depends on the picked 'Axial' value < , > - 2D image slice for previous, or next axial index Det 1...# - pick detector seqno (slider: for defined detectors for the inner most scan record) Axial:1...3 - pick axial index number (slider: 1-left 1/3, 2-middle 1/3, 3-right 1/3) < , > - 2D image slice for previous, or next detectors - Line Plots: J: 1...# - pick J index , rank 2 dimension slider K: 1...# - pick K index, rank 3 dimension slider(outer most) 1DSpectrum - 1D spectrum data of rank 1 detectors for pick J,K Ascii - generate 1DSpectrum ascii data - Pick 2D Images: 2D PanImage - pop up paniamge dialog to view 2D image array 2D-Detectors - pick rank 2 detector's image (slider) < - detector decrement > - detector increment Ascii - generate ascii data for selected image Contour - contour plot for selected image Sf-Mesh - surface mesh for selected image phi - H-rotation angle slider: 0 to 180 theta - V-rotation angle slider: 0 to 180 - Line Plots: Scan#K:1...# - 1D data of rank 2 detectors Ascii - ascii report of 1D data of rank 2 detectors Load CT - dailog for load color table Modify 1D Plot... - dialog for modifying line plot Polka - route PS output to printer polka Print - send PS output to default printer Done - close 3D dialog with option of quit yca

file_sequence_dialog
At the end of scanSee dialog, it pops up the file sequence dialog for the files located in the same directory. It shows the current fullpath file name and few buttons to select desired file to be viewed next.
	Prev File      - pick previous file from the directory
	File Slider... - use slider to pick next file from the directory
	Next File      - pick next file from the directory
	Current File   - reopen the current file from the directory
	Done           - quit yca  return control to calling program
	Displaying Realtime Scanning:
	Scan...        - pop up the realtime scanning dialog
At the click of "Scan..." button, the following "scan_monitor_dialog" pops up.
scan_monitor_dialog
The "scan_monitor_dialog" allows the user to start/view the 1D/2D plot while scan is going on. For 2D scan at end of each 2D scan, the 2D image window is updated. The start scan button allow the user to start 1D/2D scans if the user owns the scan records, otherwise the user can only view the scanning while scan is going on.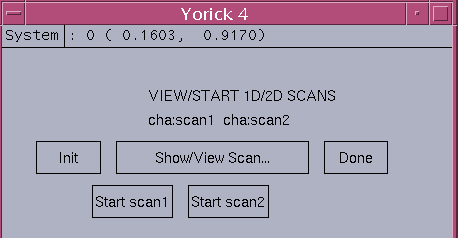
	Init               - initialize 1D/2D realtime window
	Show/View Scan...  - display realtime 1D/2D scanning plot
	Done               - close this scan monitoring dialog
	Start scan1        - start and display the 1D scan for owner
			     non owner can only display the 1D scan if detected
	Start scan1        - start and display the 2D scan for owner
			     non owner can only display the 2D scan if detected
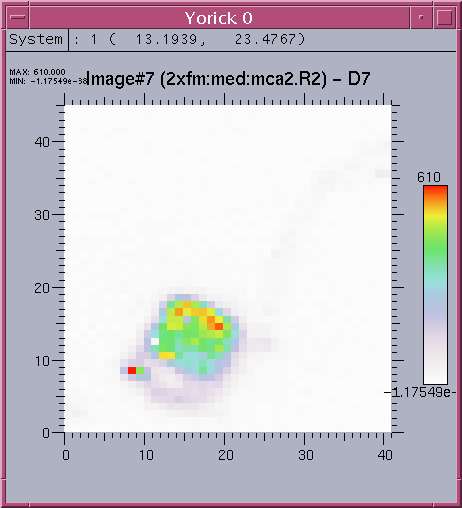
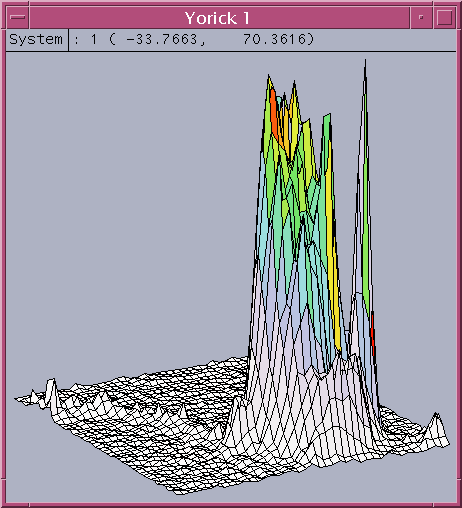
3D Scan Display
Following show a typical set of image, surface, contour, plot1D of spectrum, and plot1D data for scan 2 detectors.image
surface
contour

scan1 data
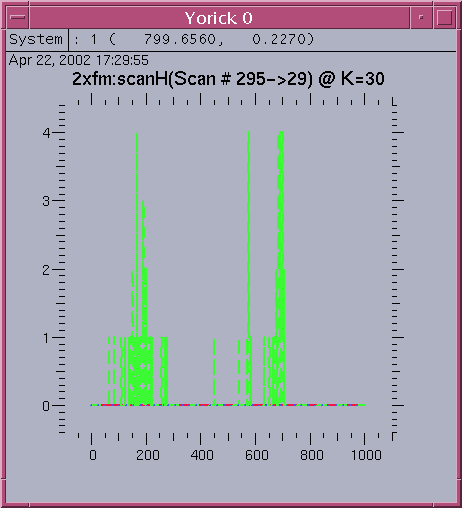
scan2 data