Chapter 2 Basic Operations
2. The Display Operations Area
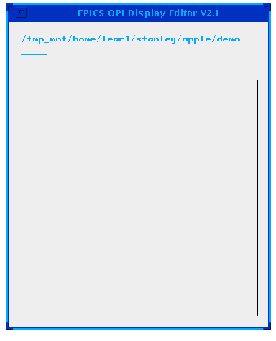
When you start EDD without a filename, it should bring up an empty display window that looks similar to Figure 2-1. Towards the top of the window, you will see the full pathname of the directory from which you started EDD or of the directory that contains the current display file. Underneath the pathname is the name of the file you are working on. In the case of figure 2-1, EDD was started from the directory
/tmp_mnt/home/lear1/stanley/apple/demo, and no file was specified, so there is a blank line where the filename would normally be.Notice the rectangular outline in the window. The area within the outline is known as the drawing area and the area outside the outline is the display operations area. It is important to recognize the distinction between these two areas and keep track of which area the mouse's pointer is in. Any operations you perform within the display operations area are "global" for the display and everything in it--operations in this area affect the entire display file. In this area you can perform operations that specify certain characteristics that the display itself and all objects within the display file shall inherit (these characteristics can be overridden for specific objects; see Chapter 4), but you cannot create or edit objects from this area. The drawing area is where you create objects and perform all operations specific to certain objects.
The rest of this chapter covers the operations in the display operations area.
2.1. Basic EDD Operations
Hold down the right mouse button in the display operations area and do not release it. Doing this brings up the display operations menu, or more simply, the display menu. Figure 2-2 illustrates what this menu looks like. It contains seven options: load display, modify display, save display, copy display, report display, activate display, and quit. Each of these options performs an operation or brings up a submenu of related options.When you move the mouse's pointer over an option, a box appears around it. This means that the option is highlighted. In Figure 2-2, for example, the load display option is highlighted. If you release the mouse while the option is highlighted, EDD will either perform the operation that the option indicates or prompt you for more information that it needs to perform an operation (such as the file you want to load if you select the load display option).
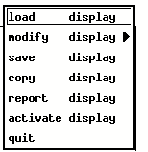 .
.Notice the triangular marker to the right of the modify display option. The marker indicates that the option contains a submenu. If you highlight the modify display option and move the pointer towards the right, a submenu appears, slightly overlapping the main menu. It contains three options: attributes, color table, and color rules. If you move the pointer over the color table option so that it is highlighted and then release the mouse button, a window will appear entitled Color Map Modify. If you move the pointer over things within the window, they are highlighted as in the display menu. If you move the pointer over the quit button at the bottom of the window and click the left mouse button, the window will disappear. You have just performed the basic operations in EDD. In addition, the following two sections describe how to enter text in text-entry fields and how to use sliders.
2.1.1. Text Entry
Most dialog boxes and operations windows in EDD have text-entry boxes where you enter in text--to specify a filename, for example. These boxes are fairly intuitive and straightforward; however, there are some characteristics which may no be so obvious.To enter text in a text-entry box, simply type in the text. When you do so, the text will have a "faded" look. If you move the pointer out of the box, the text you just entered will disappear. To enter text so that it does not disappear when you de-select the box, you must press the Return or Enter key after you have entered the text. After you do this, the text is no longer "faded".
A similar thing occurs when you delete text that has been entered in the field. If you delete a word, for instance, and then move the pointer out of the field, the original word will appear again. It will not be deleted until you press Enter/Return.
You can modify this behavior by adding the following line to your .Xdefaults file:
Edd.teTimeout 1.0When the
Edd.teTimeout X default has a value other than 0, which is the default value, text entered in text-entry boxes will not disappear or be replaced by the previous value when the text-entry box is deselected. Note that this behavior does not apply the load display dialog box.This capability was made mostly for DM, and because DM and EDD use common operations, it appears in EDD. It was implemented because users wanted the current value of text-entry objects at run-time to reflect the current value of the channel. In addition, users wanted data to be sent to channels only when they had pressed return. Hence, the value is not really entered in a text-entry box or a text-entry controller object unless the Return/Enter key is pressed. This behavior was implemented as of version 2.2, and does not appear in previous versions.
Another capability that is useful when entering text is the text-entry menu. All text-entry fields have a menu with options (except for the load display dialog box) that will aid you when entering text, though it isn't necessary to utilize the options within this menu.
After you've highlighted a text-entry line, if you hold down the right mouse button you will bring up a menu like the one in Figure 2-3.
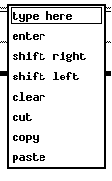
The menu contains standard text-editing commands like clear, cut, copy, and paste:
| Invoking clear deletes all the text in the highlighted area, leaving a blank entry line.
Invoking cut removes selected text from the entry line and places it in a buffer. |
Copy places selected text in the buffer, but does not remove it from the entry line. |
Paste places text from the clipboard onto the highlighted entry line, to the right of the cursor. |
|
The other options in the text-entry menu are not so obvious or standard, but are easy to understand and use:
| The type here option allows you to enter in text at the location where the cursor was before you invoked the command.
The enter option is identical to the type here option. |
The shift right and shift left options are useful when the entry on the line is too big to fit on the line. If the text is too big for the line, some of the text on either the right or left end will be hidden, and you will not be able to access it, not even with the arrow keys on your keyboard. To display the hidden text invoke these options. If the hidden text is on the left-hand end of the entry, you can invoke the shift right option to shift the entry three characters to the right. If the hidden text is on right-hand end of the entry, invoke shift left to shift the entry three characters to the left. These options have no effect on entries that fit on the text-entry line. |
|
2.1.2. Working with Sliders
Many fields in EDD's windows have sliders. Sliders are used to manipulate a value within a set range of values. For instance, in Figure 2-8, the range of values for the 'horizontal position' attribute are 180 and 1,152, and the range of values for vertical position are 180 and 900. The actual value that you change is the second value, the value in between the range values. In Figure 2-8 the values for horizontal and vertical size are both set to 327.To change a slider's value:
- 1. Highlight the slider.
- 2. Hold down the left mouse button and drag the mouse towards the right to increase the value, and towards the left to decrease it.

When you drag the mouse either right or left to increase or decrease the slider's value, the value changes in increments or decrements. The coarse, medium, fine, and xfine options determine the gain of the slider, the number of the increment or decrement. The coarse setting of the gain increments or decrements the value by 5%; the medium setting, by 0.5%; the fine setting, by 0.05%; and the xfine setting, by 0.005%. With these options, you can change the value by varying degrees of exactness. However, the slider cannot display decimals or fractions, so if you change the horizontal setting to 327.5, for instance, the window will change accordingly but the value will only display 327. By default, the slider is set to coarse.
Choosing the keyboard option allows you to set the slider's value manually by entering in the numbers from the keyboard. To use this option, choose keyboard from the slider menu, which will bring up a Keyboard Entry window. This window has an entry line in which you can enter the value, which must be within the slider's range of possible values.
Invoking the increment and decrement options increases or decreases the value by the increment or decrement setting.
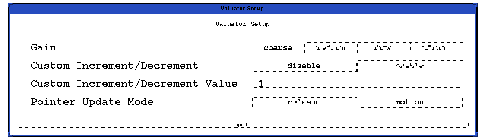
Invoking setup brings up a Valuator Setup window (Figure 2-5) that has three choice buttons and one text-entry line. The choice button for Gain allows you to set the gain to the four settings discussed above. The Custom Increment/Decrement choice button allows you to enable or disable an increment/decrement number. If you left-click enable on the choice button, invoking the increment option, for instance, increments the value according to the Custom Increment/Decrement Value. This value is set on the Custom Increment/Decrement Value text-entry line. You simply enter in the number of the desired increment or decrement.
The Pointer Update Mode choice button lets you change the manner in which EDD will update the display according to the changes you have made. If you choose motion, EDD will update the display as you change the value in the slider. If you choose release, EDD updates the display according to the changes only after you have released the mouse button. For instance, in the case of the horizontal and vertical size attributes, as you change the slider's value, the window will grow or shrink as you change the value if the Pointer Update Mode is set to motion. If it is set to release, the window will take on its new size after you have released the mouse button. By default, the Pointer Update Mode is set to motion on every slider.
The slider menu is found on every slider in all operations windows. It is also identical to the menu for the valuator control object. The Valuator Setup window and the slider menu were, in fact, designed for valuators, which is why the window is called what it is.
2.2. The Display Menu
Now that you know the basic operations regarding options and menus, you are ready to learn about what the options in the display menu actually do.Most of the options in the Display menu perform basic file operations. Save display, for instance, saves the display you are working on in a file under the name that you give it. Copy display copies the file you are working on into a file that you specify. What other options do, however, is not so obvious. The report display option, for instance, saves the file in an ASCII display file instead of a binary file. Even the obvious operations like load display and save display have some idiosyncrasies that you should know about. We'll start with the obvious file operations--load, save, copy, and quit--then move on to the not-so-obvious operations, activate display and report display. Finally, we will cover the modify display option, or rather, what the options in its submenu do.
2.2.1. Load Display
Invoking the load display option brings up a standard dialog window in which you can choose the file from a list of files in the current directory or enter the filename directly. EDD can load an ASCII display file in addition to binary display files (ASCII files should have the extension .adl; binary files have the extension .dl. ASCII files and their purpose will be explained when we discuss the report display option).
When you invoke load display, you will bring up a window like the one in Figure 2-6. In the Directories box you can change the current directory from which to select the file, in the Files box you can choose which file to open in the current directory, and in the Selection box you can specify the file to open by name. In the Filter box you can specify a regular expression with the wildcard character (*), which will cause only files matching the expression to be displayed. For instance, if you want to display only files with the .dl extension in the dialog box, you can enter,
*.dlthen, after you click the Filter button, only
dl files will be displayed.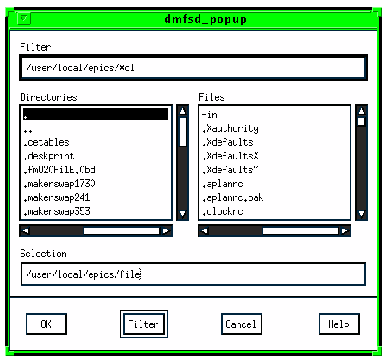
EDD will load and display the file. If you are working on a display that you have made changes to and that you haven't saved, when you load a file, EDD will beep at you and bring up a dialog box to warn you that if you load the file you will discard all the changes you made to the file you are working on. If you want to save those changes, left-click the cancel button, bring up the display menu, and choose the save display option. If you want to discard the changes, left-click the execute button.
If EDD can't find the file it will display this error message in the display operations area:
Load file access problem. Context: [pathname of entry]Another problem may occur when you are loading a file that uses a template for its color table and its color rules. If EDD can't find the template file, it will load the display, but not all the colors the display is supposed to have. When this occurs EDD will display the following error message from the command line:
External clr map display file access problem [templatefilename]
External clr rules display file access problem [templatefilename]
To remedy the problem, you must locate the color template file that the display uses and place the directory that it is in, in your EPICS_DISPLAY_PATH variable (see section 1.2., Setting Your Environment Variables, to find out how to set this variable), or put the file in one of the directories that are listed in your EPICS_DISPLAY_PATH variable.
2.2.2. Save Display
The save display option saves or writes the current display into both a binary and an ascii file. When you invoke the save display option, if you did not specify a file when you started EDD, a dialog window will appear. The window has two text-entry lines. The path entry line specifies the directory to which you want to write the file, and the file entry line specifies the filename. After you enter in a filename, left-click execute on the choice button. After EDD writes the file, it will display the full pathname of the file in the display operations area.| NOTE: the dialog window only appears when you have started EDD with a blank display window and if you have not already saved that display. For example, if you have already saved the display once, EDD automatically writes to the file already specified when you invoke save display. And if you have loaded an already existing display file, EDD automatically writes to the file from which EDD loaded the current display. EDD does not have a save as option, so if you have already saved a file or are working on an existing file and want to give it another name, you must use the copy display option (see the next section) to copy the display into a new file and then delete the old one. |
To the binary file, EDD will add the extension .dl, and to the ascii file it will add the extension .adl.
2.2.3. Copy Display
The copy display option writes the current display into a new binary file that you specify. Invoking this option brings up a dialog window similar to the dialog windows that appears when you invoke the save display option. In this window you enter the directory's pathname to which you want to copy the file and the filename of the new file, and then left-click execute on the choice button.When the copy display option writes the file into another file, it saves the file with the new filename, and the display is re-opened with the new filename, so it basically becomes the new file.
| IMPORTANT: EDD does not write the current version of the file into the original file before it writes the display into the new version. So any changes you have made since the last time you saved the original file will appear in the copied file but not the original. |
2.2.4. Quit
The quit option quits the current display and exits EDD. If before you invoke the quit option you have made changes to the file you are working on and have not saved those changes, EDD will beep at you and bring up a dialog window, warning you that if you quit you will discard those changes. If you wish to save any changes you have made since the last time you saved the display, choose cancel on the choice button, bring up the display menu again, and invoke the save option. If you wish to discard any changes you have made since the last time you saved, choose execute on the choice button.2.2.5. Activate Display
This option spawns DM so that it runs with the current display. It does the same thing as starting DM with the display (makes the channel connections, etc.) except that you never did quit EDD, so the EDD display is there for you to look at and change if you wish.Before you invoke activate display you should have some familiarity with DM (see Chapter 9, DM: Run-time Operation).
2.2.6. Report Display
The report display option saves or "reports" a copy of the current display into an ASCII display list file. The report display option works basically like the save display option: it brings up an operations window with text-entry fields in which you enter the directory and filename to which you want to save the file. The report display option automatically adds the file extension .adl onto the filename in the file text-entry line, so you do not have to type it in. To convert an ASCII file back into a binary file, just open the display using EDD and invoke the save display option. When EDD loads ASCII files, it converts them to binary files.
The main purpose of ASCII files is upward compatibility between EDD versions. EDD version 1.16 is incompatible with versions 2.0, 2.1, 2.2, 2.3, and 2.4. Versions 2.0 and 2.1 are compatible, however. Version 2.2 is incompatible with all other versions, as are versions 2.3 and 2.4. When versions are incompatible, you cannot load files created with one version using another version. For example, if you try to load a file from version 1.16 into EDD 2.1, you will get the following message:
Binary display file version, 1.16, does not match this program's display list version: 2.1There are several scripts currently available that convert ASCII display files of one version to files compatible with another--they convert all the ASCII display list files in the directory in which the converter is run and place the new, converted files in a temporary directory, or will place the old files in a temporary directory. For example, the script
convert_1.16_to_2.0 converts files created using EDD 1.16 to files that EDD 2.0 can use. There are also scripts available which convert .dl files to .adl files and vice versa, making it possible to batch-convert a directory of files without having to open each one. See the README file for version 2.4 for more information on these scripts.
All conversion scripts should be located in the bin directory of the EPICS extensions directory ($EPICS/extensions/bin). If you cannot locate these scripts, ask the EPICS applications developer or your system administrator.
- 2.1. - Basic EDD Operations
- 2.1.1. - Text Entry
- 2.1.2. - Working with Sliders
- 2.2. - The Display Menu
- 2.2.1. - Load Display
- 2.2.2. - Save Display
- 2.2.3. - Copy Display
- 2.2.4. - Quit
- 2.2.5. - Activate Display
- 2.2.6. - Report Display
EDD/DM User's Manual, 2.4 - 27 MARCH 1997 [Next] [Previous] [Up] [Top] [Contents] [Index]